In 1981 I represented Matrox - the Canadian computer and display manufacturer - in Denmark. I visited their facility in Montreal. They had just developed a frame store with a resolution of 256 by 256 and 4 bit pr. pixel.
They also developed a matching A/D converter to connect to a camera, so you could capture, store and display an image. The computer was based on Z80 with 64 Kbyte memory, and it had floppy disk drives – the big ones – where you could store the image. It was in a big blue box named MAX 10, and it sounded like a jet engine.
40 years celebration of the first industrial vision system
This system was exhibited at a computer show in Copenhagen in 1982. It really gathered a crowd. I placed a matchstick in the spacebar, and the system continuously caught and displayed images. Everyone was waving at the camera, and looked at the frozen B/W low resolution picture. That was never seen before !
Ole Hansen, an engineer from NKT, came by and asked if the image was stored in RAM, and if we could measure geometry in the image. Yes. It could be programmed to measure the grey level in each pixel.
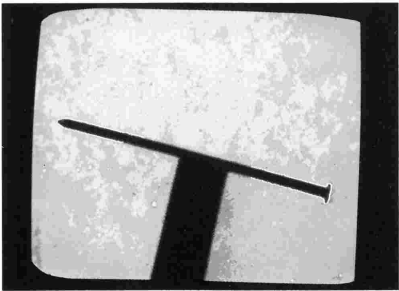
What if you placed a nail, 130 mm long as used in the building industry, under the camera, could we then measure how straight it was. And if it had a pointed end, and that the head of the nail had the right shape?
Yes, that seem to be a good idea! ….. and I believed that would be possible.
After the exhibition Ole called me, and asked if I could make a paid preliminary investigation. I was quit willing to do that. The study was ordered and I started looking at it.
What had I got myself into? - - well actually the start of the vision industry, where I have now been for the last 40 years.
In 1982 CCD cameras did not exist. The cameras were vacuum tubes, using magnetic scanning. The images were not stable, or geometrically correct, and they also drifted with temperature. I solved this by placing a straight metal ruler near the nail in front of the backlighting, and adjusted the optical center to be exactly between the nail and the ruler.
The resolution was about 0,8 mm pr. pixel and the pixels were clearly visible in the 256 x 256 format. The pixels were not square, as the camera image was in the old 3:4 television format.
I placed the nail and reference ruler at an angle to get good steps, like 10 pixels in the X direction for 1 pixel in the Y direction. The program should measure the number of steps in the Y direction when scanning in the X direction. The steps in Y should be uniform over the entire nail if the nail was straight.

A straight nail showed quite a deviation over the scanned area, but so did the ruler near the nail. It was then a question of designing the program so it measured the difference between the ruler and the nail.
It looked feasible, and we got the order.
I needed an assembler programmer and hired Jesper Nilausen who programmed the system in a couple of weeks. It is probably the best paid vision project ever !
The system was delivered and obtained the desired accuracy of 0.1 mm. This was 8 times better than the pixel size.
It was a high-risk project in a completely new territory, there wasn’t even a name for the technology. We were the first to make an industrial vision system in Denmark and probably in Europe. I have never heard of a system from before 1982.
If anybody know of an earlier system - then send me an email JL@JLIvision.com.


